are often the easiest way to capture information from a web site, application or document. However, remembing the Mac's arcane command-shift-option-4 shortcut can be difficult and annoying.
Further, just capturing an image only gets you so far -- it's what you do with the image afterward that's just as important.
This is where SuperTab steps in.
With SuperTab, now you can take Screen Shots with a single click of your mouse! No more cryptic Keypresses to remember.
And now, you can even take Screen Shots with
Voice Control. Just say "Take a Screen Shot"!
You can also create any number of Screen Shot Items -- one for each type of Screen Shot you want to take, be it selecting an area of your Desktop, choosing a specific Window, or capturing your entire Screen -- either now or after a delay.
On MacOS Mojave, you can even take an Interactive Screen Shot...
As well, SuperTab lets you do more than just capture a Screen Shot -- you can automatically have the Screen Shot saved to a Folder of your choice, opened in any Application of your choice, placed on the Desktop, copied to the Clipboard and more.
When you add a Screen Shot item to any
Custom Items Tab Row, you select the type of Screen Shot to take, specify any options, and then choose what to do with the captured image:
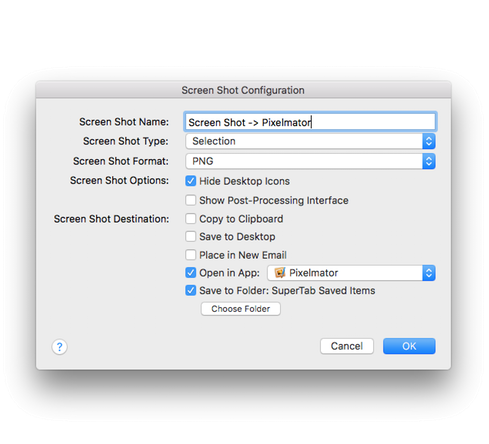
First, you can give your Screen Shot Item a name to help distinguish it from other Screen Shot Items you may create.
You next indicate the type of Screen Shot to take:
Manually selecting a portion of the Screen.
Manually selecting a portion of the Screen after a delay.
Manually selecting a window.
Manually selecting a window after a delay.
Automatically capturing the Frontmost Window.
Capturing the entire Screen.
Capturing the entire Screen after a delay.
Choosing from the above options at the time of the Screen Shot.
On MacOS Mojave, you can also choose an interactive Screen Shot where can configure the shot on the fly!
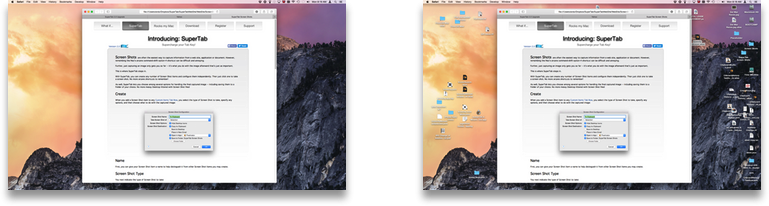
Then you can choose if you want SuperTab to automatically hide the icons on your Desktop for a super clean Screen Shot:
vs.
If you are running on MacOS Mojave, you have the new addition of showing the "Post-Processing" Interface.
Here you can:
Mark up your Capture
Rotate your Capture
Crop your Capture
Add text to your Capture
Share your Capture
Finally, you specify what to do with the Screen Shot image once taken. You can chose one or more of the following:
Copy the image to the clipboard.
Save the image to the Desktop.
Create a new email with the image in the body.
Open the image in an Application that you specify.
Save the image to a Folder of your choosing.
Now, with your Screen Shot Item fully configured, you need only select it within SuperTab and it will work with you to take the perfect Screen Shot and to place it exactly where you want it!
Best yet, if you hold down the Command Key while taking a Screen Shot, SuperTab will queue up another Screen Shot. Keep the Command Key pressed and you can take as many back-to-back Screen Shots as you want. Super easy, super fast!
There are many easy ways to access your Screen Shots after you've taken them, well beyond just having an image on your Mac's Clipboard...
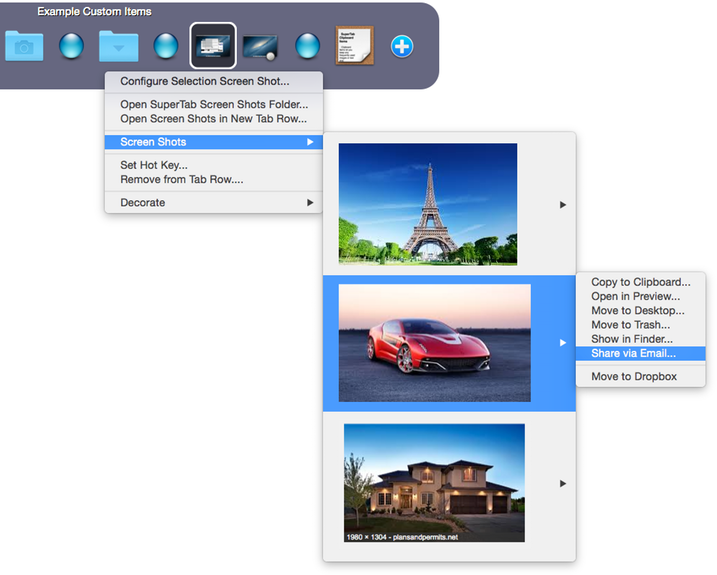
If you've opted to save your Screen Shots to a Folder, you can:
1) Right-click on the Screen Shot item and access your screen shots directly within SuperTab!
2) As well, you can simply open the Screen Shots folder from the same menu.
3) You can even create a new SuperTab Tab Row pre-populated with your Screen Shots via the menu.
Clipboard History
Moreover, if you create a new
Clipboard History Tab Row in SuperTab, it will automatically display your recent Screen Shots.
There are several advantages to the way SuperTab allows you to take Screen Shots.
- You no longer need to remember the arcane Keyboard shortcuts.
- You can have your captured images automatically open in an App you specify.
- By saving adding a Clipboard History Tab Row to SuperTab, you can instantly access your recent history of taken Screen Shots directly within SuperTab.
- You can take as many Screen Shots as you want and you won't have to worry about making a mess of your Desktop.
- You can create many types of Screen Shots to suit your needs of the moment: one by selection; one of the screen; one of the front window; one that copies to the clipboard; one for sending in emails; and so on...
Now, with SuperTab's
Voice Control, you take Screen Shots just by asking your Mac!
Built-in to SuperTab is the voice command "Take a Screen Shot": Just telling your Mac to "Take a Screen Shot" will result in it asking you the type of Screen Shot you want and then taking it. Simple!
You can use Voice Control to invoke any of your Screen Shot Items by name. If you have a Screen Shot Item named "Window Screen Shot to Clipboard", just tell your Mac "Open Window Screen Shot to Clipboard" and it will do your bidding.
SuperTab's Screen Shot capabilities are simple, powerful and put the Mac's built-in Screen Shot facilities to shame.
However, we realize that SuperTab cannot do some things that other products can that are dedicated solely to taking Screen Shots and Video Captures.
That's why we've now integrated SuperTab with
Snagit -- the award-winning, user favorite Screen Shot App for the Mac.
Now you can open, preview, share and copy your Snagit Captures directly from within SuperTab. Take a look at our
Snagit Integration page for all the details.